User Guide – Teamoty Scheduling
4. SCHEDULING CREATION
Once the project settings have been configured, you can start creating your schedule. To do this, go to the Projecttab of the header then the schedule sub-modules will appear on the left column.
4.1. Objectives
- The creation of sequences from tasks and all the settings seen previously
- The generation of a sequence schedule
- The edit of the sequence schedule
First, creating a project schedule involves creating sequences and tasks associated with it.
4.2. Sequences
- A sequence is a set of successive tasks apply to one or more areas, for example the housing sequence that applies to all the dwellings in a building.
- To be able to edit a new sequence in the project, simply go to the Sequencestab then click on
 .
. - You must define for each sequence: a color (to be displayed on the scheduling), a name, a code and a start date which will serve as the start date of the first task in the sequence.
- The colors already used for sequences are displayed with a white cross:

- You arrive on the screen below:
- As defined, a sequence necessarily relates to specific areas of the project. To select them, go to Choice of areas then select the areas in the sequence. You can filter the area types with the Filter button :
 .
. - You can filter the area types with the button Filter
 .
. - You can also change the size of the columns, to enlarge or shrink them.

- Three choices are possible to define the execution order of the sequence
![]() : Automatic assignment in order of display in ascending order
: Automatic assignment in order of display in ascending order
![]() : Sorting of areas by automatic assignment in descending order
: Sorting of areas by automatic assignment in descending order
![]() : Manual numbering or modification of the order of one or more areas (modification is possible when the boxes are white).
: Manual numbering or modification of the order of one or more areas (modification is possible when the boxes are white).
- You also have the option to add notes/comments on a sequence, from the Notestab, and then click the button
 at the bottom right of the page At each click, a yellow it post will appear. Just click on it to write in it.
 - To delete a note, just put your mouse on it, then a trash can will be visible at the top right of the it post :
 .
. - If you have added one or more notes to the sequence, you will see a yellow it post to the right of the name, like this: :
 .
.
Once your sequence has been validated, when you come back to the sequences page, and find the buttons below: ![]()
- The middle button (edit scheduling
 ) is not available for the moment, it will be visible once a task has been created.
 - The Edit button
 allows you to modify the information entered for the sequence.
 - The Deletebutton
 allows you to delete the sequence.
 - After creating a sequence, you must click on the Edit tasks button to enter the sequence and create tasks: see the Tasks chapter for the procedure to follow.
- The “Sequences task settings” button
 allows you to quickly and massively modify the tasks in the sequence. This opens a table containing all tasks in alphabetical order; column elements can be edited, and column sizes can be adjusted:

- You can open/use the black square at the bottom right of the cells to copy values down or up. And a filter is available for the trade column:
 .
. - Once a parameter has been modified, the box will appear in orange:

This ![]() button is also available for all sequences:
button is also available for all sequences: ![]()
It is also possible to add batches via your library with the button «create from the library» : ![]() .
.
![]() Whenever you modify sequences and / or settings, for example to add a milestone or day off, or for example after having defined several teams for a trade, remember to regenerate the sequences which will refresh all the sequences with the Refresh button
Whenever you modify sequences and / or settings, for example to add a milestone or day off, or for example after having defined several teams for a trade, remember to regenerate the sequences which will refresh all the sequences with the Refresh button ![]() .
.
4.3. Sequences family
- It is possible to group the sequences into families, to classify them and find them more easily. To do this, from the editing of a sequence, you have in the top left a drop-down menu Sequence family:

- If you have already added them, they will appear in the list otherwise just click on the button
 and fill in the name.
 - Once the sequence is validated, the families will appear in the header, those without families will group in: No sequence familyas below

![]() By clicking on the family lines, you can choose to hide or display the items.
By clicking on the family lines, you can choose to hide or display the items.
4.4. Sequence scheduling
- Once you have generated a sequence as well as the associated tasks, you can view the schedule of the sequence by clicking on the Edit scheduling button
 (central button not initially available).
![]() If once you have added the task and the button
If once you have added the task and the button ![]() still does not appear, regenerate the sequences by clicking on (this button allows you to update the sequences).
still does not appear, regenerate the sequences by clicking on (this button allows you to update the sequences).
- You get a sequence schedule as below, with the sequence execution order by area:
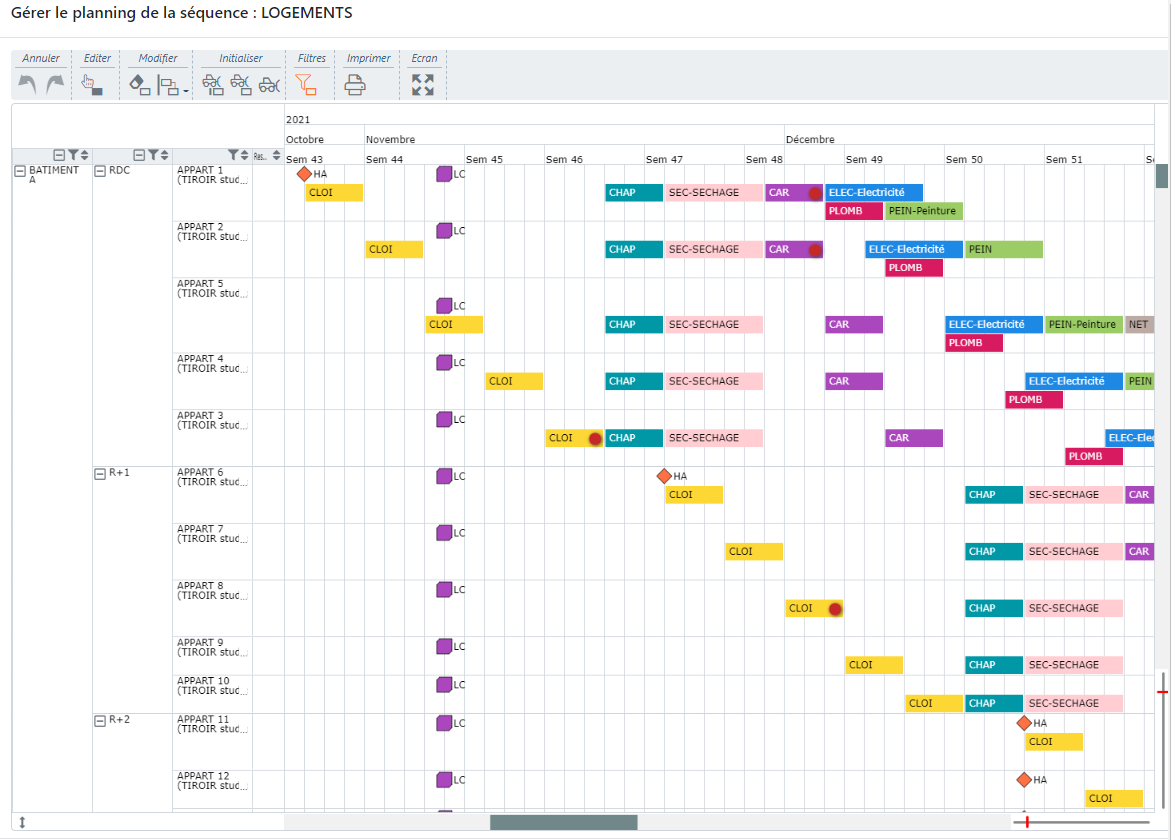
On this screen, you can change the name or the execution of the areas of a sequence:
 Allows you to change the order of the zones of the sequence Once the mode is selected, just hold the left click on an area and drag & drop vertically.
From this screen also, you can initialize the sequence via several buttons:
 : Delete all changes except tasks with the earliest modified date
 : Removes all changes except for dotted tasks
 : Removes all changes to the sequence
You can also print the sequence from this schedule, click on .![]() .
.
4.5. Links between sequences
- Once several sequences have been created, it is possible to link them together. This link is materialized on Teamoty at the task level: this the same as linking two tasks from two different sequences to each other.
- To do so, go to edit the task (Sequence – Edit tasks), ithen you will see two tab : predecessor and sucessor add a link by clicking on
 , as in the example below. after:

- You have to choose the task to be linked from the dropdown list (choice of sequence – task) with the type of link desired (Finish to Start by default) and possibly several days of waiting:
- You can add several sequence links on the same task, by clicking on the button
 again
again - Once the links between sequences have been made, you can view them in the Sequencestab, then click on the button
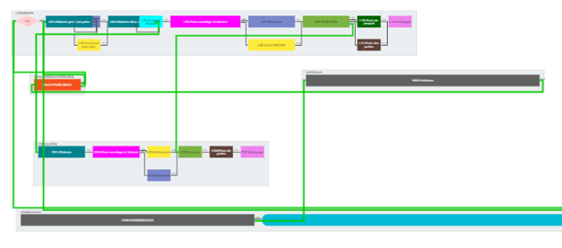
 . This displays all the sequences of the project as well as the links between them. You have an overview of the links between sequences which are displayed in green:
![]() You can print the sequence diagram by clicking on
You can print the sequence diagram by clicking on ![]() and save the graphic position of the sequences.
and save the graphic position of the sequences.
4.6. Duplication of sequences
- A sequence created on a basic version can be duplicated on another version, which saves you having to re-enter it.
To do so, in the Sequencestab, click on Duplicate button![]() of the sequence; then you can choose which version you want to duplicate it to, like below:
of the sequence; then you can choose which version you want to duplicate it to, like below:
4.7. Printing of sequences
- To view your sequences and their sequences, you can print the booklet by clicking:
 on the Sequencetab.
 - Here, you can choose to print the inter-sequence diagram as well as the Gantt workflow for each sequence:

- You can choose the printing format as well as the orientation of diagram Once selected, simply click on
 , to generate the PDF.
4.8. Types of tasks
- A task is an action in a sequence attached to a trade. A task is therefore essential data and is the basis of the scheduling.
To create a task in a sequence, click on theEdit task button ![]() of your sequence then you will have several tasks available
of your sequence then you will have several tasks available
![]()
You will find below the different types of tasks possible under Teamoty with their features. Each type of task is detailed below.

4.8.1 Task duplication
- It is possible to duplicate a task in the editing of tasks in a sequence.
- To do this, stay on the task without selecting it, a pop-up like this will appear:
 . Just click on it and fill in the name and code of this new task. The rest will be identical to the duplicate task
4.8.2 Link between tasks
- Once your tasks are created, you can link them together within your sequence. To do this, just do;
-
- Left click on the right side of the task
- Hold the left click and then move to the task to link
- Then release on the task to link and the link is created
-
-
-
- Delete a link by left clicking on it and then using the “DELETE” key on the keyboard
- By double clicking on a link, it is possible to modify the data of the link including the type of links
- Here too, you can generate a number of days waiting between the two tasks
- Finish to Start (par défaut), Start to Start, Start to Finish, Finish to Finish.
-

4.8.3 View Sequence Diagram
In editing the tasks of a sequence, you can display the sequence diagram in two different formats, by clicking: ![]()
- The classic display of the sequence diagram:

- Viewing without visible links:

This makes it easier to see the links between the tasks, since the tasks will be based on the links created (Finish to finish, start to start etc.). Attention this display is in progress, it is a beta version!
4.8.4 Creating a Task Group
You can group tasks together as a group to lighten the scheduling display.
- From the “Edit tasks” tab, you will find a Groups module with this button:

- A window will open to edit the group. You must fill in the color/name/code as well as the tasks to be grouped.
- Once validated, the tasks will display with a number at the top left, like this:

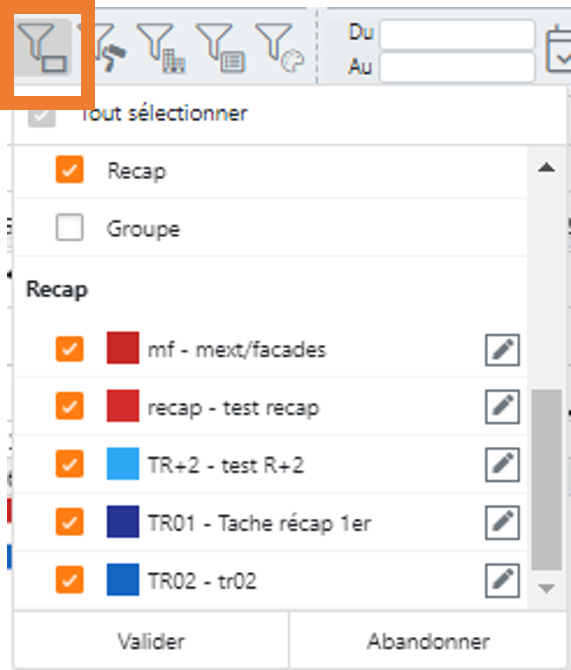
To see the groups, go to the Planning tab, then in the Filters tab, check “Group”, you can also choose which group(s) displayed in this filter.
You can choose to leave the first area with the task details by activating: ![]()

4.9. “Work” task
- By default, the commun use task is the work task

- A task is defined by a color, a name, a code. The task will start on the date entered in the sequence, so if there is no link that triggers the start of the sequence, it is not necessary to add a date at the earliest in the task (and therefore the task will not run before this date):
![]() Keep in mind that by default, the links between tasks and / or sequence are stronger than the earliest date entered in sequences and / or tasks. An start date is not required to create a task
Keep in mind that by default, the links between tasks and / or sequence are stronger than the earliest date entered in sequences and / or tasks. An start date is not required to create a task
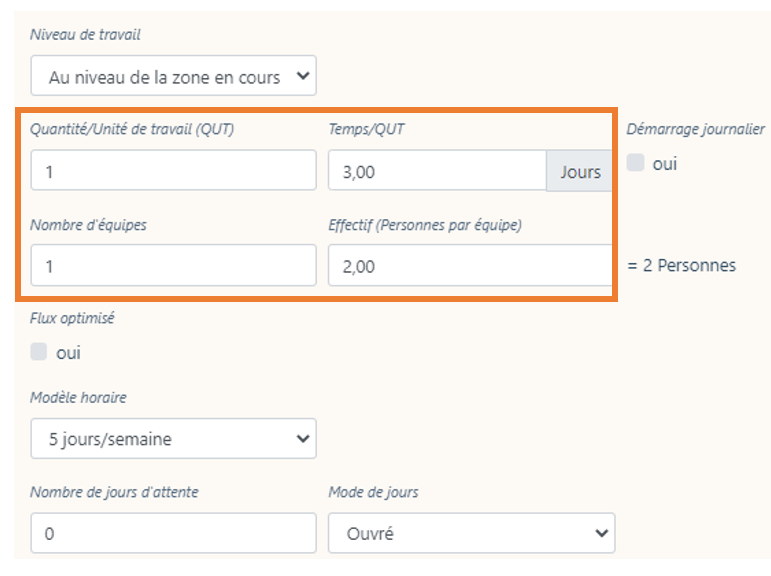
- The necessary fields to be defined per task are:
- Trade(at this point, the color of the task will automatically take the color of the trade)
- Quantity / labour unit in relation to the level of work
- Time / Unit of work required to achieve the quantity entered according to the level of work
- Number of teams for carrying out the task
- Workforce by team (to get the workforce curve)
- Level of workdefines the area where the task is executed. By default, it is executed at the level of the current area, the areas that you have defined in the sequence.
You can change it according to larger areas; upstairs or building, for example. This avoids microtasks and ensures a better visualization of the affected tasks.
The followbutton ![]() , to the right of the task name, allows you to monitor the execution of this task per day on the overall schedule (see Execution monitoring indicator).
, to the right of the task name, allows you to monitor the execution of this task per day on the overall schedule (see Execution monitoring indicator).
For example: the task belongs to a trade and will therefore do a quantity of 1 apartment (at the level of my current area defined in the sequence) for a necessary time of 2 days:
- If you fill in a quantity higher than or equal to 2, you will see this “rythm break” field appear:
 which will allow you to cut this amount for work levels.
For example: If the quantity in the task is greater than the number of flat per floor, then Teamoty will do together all flats on the floor.
For a PAINTtask with a quantity of 2 and a break in rhythm upstairs, he cuts then the quantity for the last apartment of the floor
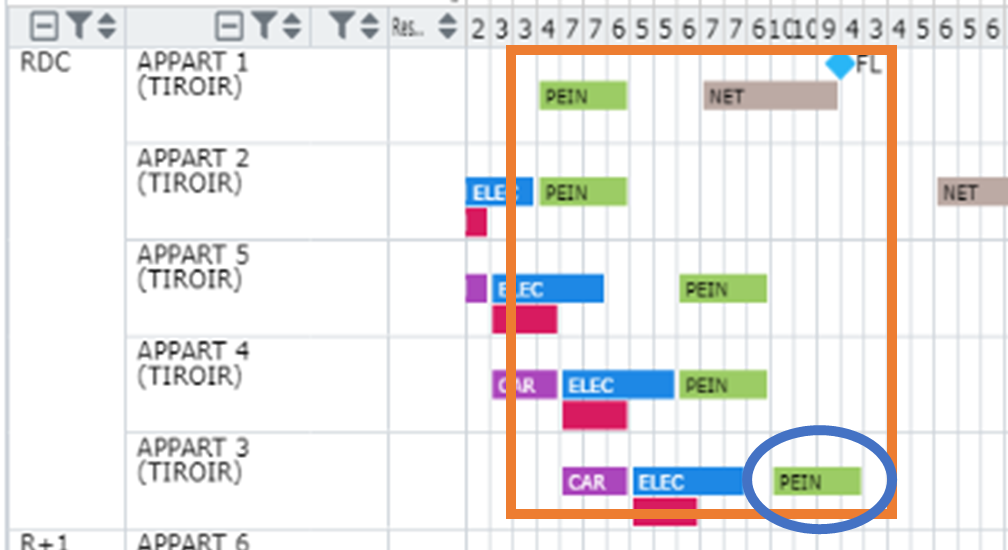
The waiting days within a task allows you to configure a waiting between two successive tasks.
4.9.1. Work time model
- By default, the hourly model applied is that of 5 Days/week eliminating Saturday and Sunday.You can modify by task or at the sequence level, which will be applied by default to all tasks in this sequence.
- It is possible to choose a daily time model per task. For example, to put cleaning or moving tasks only on Fridays. You must then choose “Other” in the hourly model, then the days worked will appear on the right:
4.9.2. Optimized flow
- The notion of optimized flow on a task ensures work continuity when we have different cadences between tasks.
- To do that, you need to click on :

- You can choose to make an optimized flow on all the tasks in the sequence or to make breaks in the optimized flow on your levels of different zoning levels:
 .
.
For example: here the optimized flow box is checked without break:

And here the optimized flow box is checked with break in the floor:

4.9.3. Daily start
- If you have half-day task, you can force all day task to start, by checking in the task:

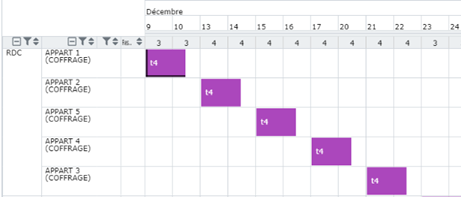
- For example, here the T4 tasklasts 1 and a half days and starts at the beginning of each day and not the next half day. Teamoty creates a ½ day “wait” for each task:
4.9.4. Task family
- The task family is a centralizer to keep a link between tasks of the same nature but in different sequences. This field is not required for creating a task.
For example: Sequence 1: T1 Painting / Sequence 5: T3 Painting the two tasks have the same nature and therefore the same family.
- When creating a task, the family does not exist in the list, you must choose Task family. It will be created with the name of the task being created. A color is also associated with the family which by default corresponds to the color of the trade associated with the task being created.
When you need to create a task with the same nature, you can select the right family and the color will be defined automatically. Now this element is little used since it is not reused when using the schedule.
4.9.5. Tags
-
You can add «tags» on each task to differentiate them and find them more easily. It is possible to add several tags per task. They can contain letters like numbers, without maximum size.
When editing each task, it is now possible to add “tags” at the bottom of the task identification:

-
If a tag has already been used, Teamoty will suggest it to you if you type the first letters like this:

A filter will be available in the PLANNING tab to display the tasks containing these tags as well as in the ANALYSIS tab.
4.9.6. Ratio measurement
When creating a Work task, you will find at the bottom of the page, the possibility to measure the ratios to the task per day: ![]()
To do this, you have to fill in a task conventionally, then complete the ratio per dayas well as the unit.
Then going to the Microtaskstab, you will find the following:
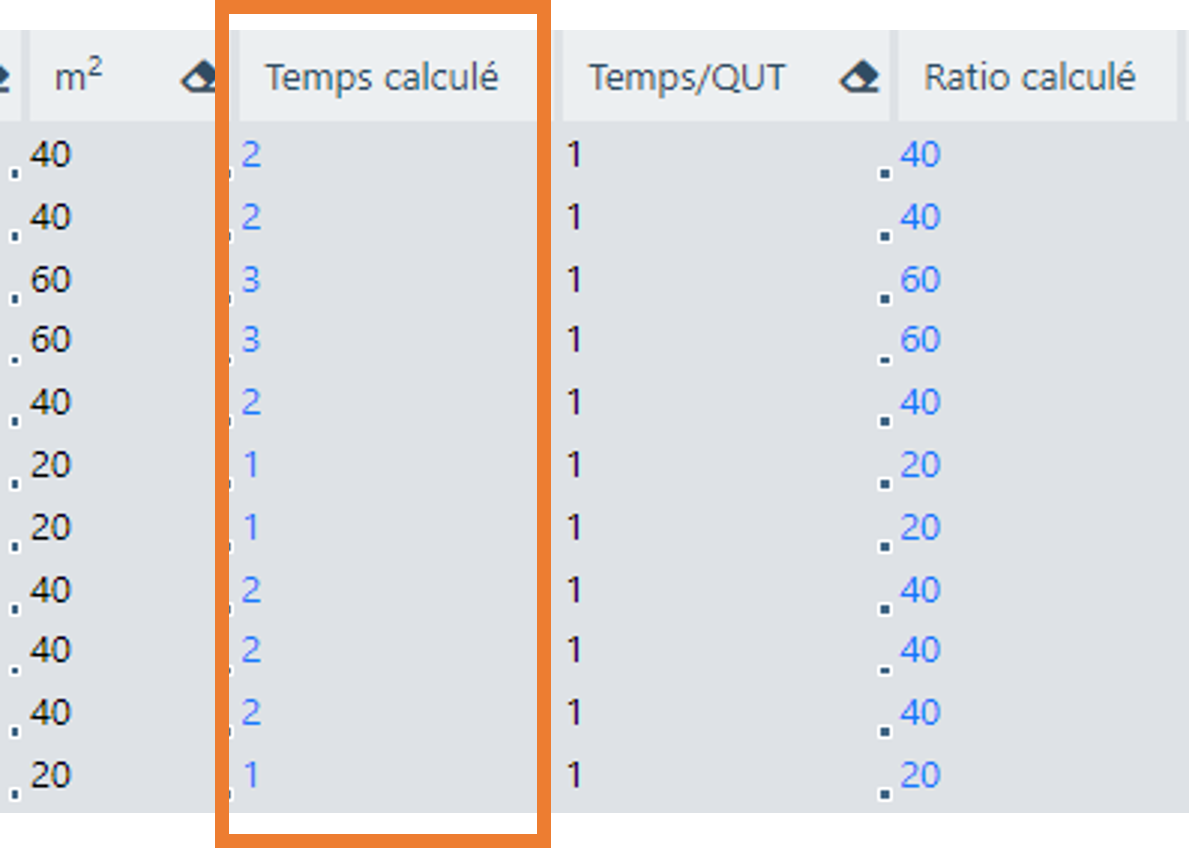
You must fill in the measurements of each zone, then according to the ratio entered, Teamoty will calculate a ratio (column Calculated ratio) and propose you a calculated time (columns Calculated time).
You are free to copy it into the Time/QUT column, or leave the initial duration. It is always this column that will give the duration of the tasks in the schedule.
Example:Ratio of 20 m2/dwelling/day, and 40m2 for the first two dwellings,Teamotyproposes a calculated time of 2 days, then 3 days on the 3rd, since it is 60m2
You can also choose to count headcount in the calculation by checking: ![]()
Teamoty will take into account the ratio entered per person.
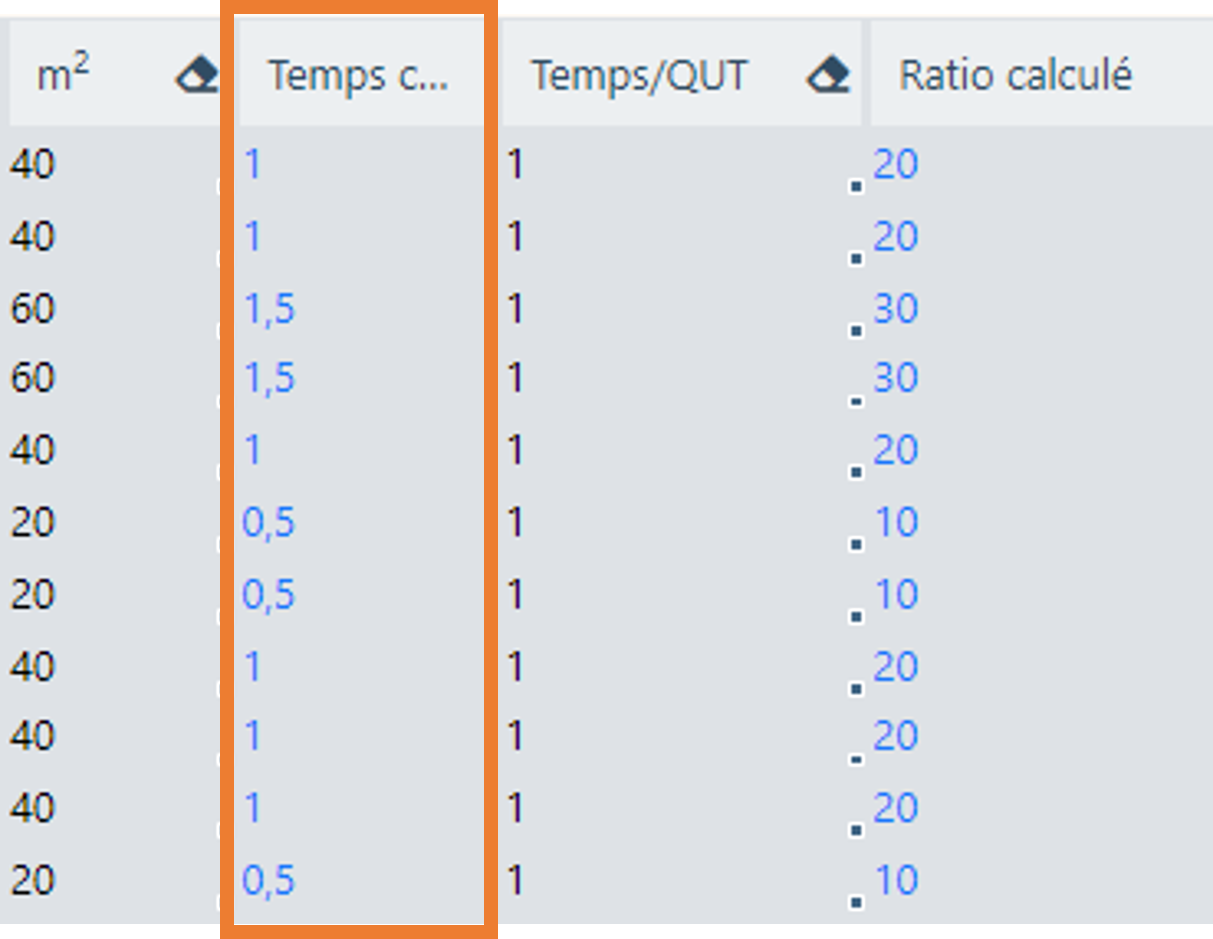
In the previous example on a ratio of 20m2/dwelling/day, Teamoty indicated 2 days calculated for the first two dwellings.
Taking into account the staff of 2 on this task Teamoty then calculates a time of 1 day, since each person can make 20m2/day/person, then 1.5 days for the accommodation of 60m2.
4.9.7. resources and materials
- For each task, it is possible to allocate resources as well as materials. This makes it possible to track resource and material balance sheets and then, for example, to rebill the usage time per batch or per company or in order to have stock management by level.
- For resources, it is possible to define a list of resources such as a lift or a crane. To do so, you must go to the resourcestab in editing tasks.
- If a resource type has been defined with more than one associated resource, you can the task that will start using the resource and for which task it will be released. To do this, in the task edition, in the Resourcestab, you will find the dropdown list with motion type: USEand RELEASEas well as the Type of resource to be associated:

- To have this dropdown list, you must have configured the resources in the settings (see Resources in the Settings chapter).
For exemple :

- For materials, it is possible to assign materials that will be usable in the form of a report. To add more, just go to the Materialtab of the task, and complete the type of material and its quantity.
For exemple :

- Unlike resources, these are not predefined in the settings, if they are not present in the dropdown list, you must click on
 to add them manually, then assign a quantity of material

Then finally, you must complete the name of the material to add and its unit:

4.9.8. Microtask tab
- This microtask tab allows you to manage specific task cases for each zone of the sequence (or micro task). It is therefore possible to change the date as soon as possible, the duration, and the staff for each task on a specific area

The task name can be changed for each micro-task using the Labelcolumn.
![]() It is also possible to change the number of teams per micro-task in order to increase or decrease the load as the site progresses.
It is also possible to change the number of teams per micro-task in order to increase or decrease the load as the site progresses.
- You can copy a data to the cells below, for this you must keep the small black square at the bottom right of each cell to duplicate the data down.
The order of the zones allows to redefine the order of execution of the tasks in the defined zones. You can filter by zone and type of zone for each zoning level using the funnel:
Three choices are possible to define the execution order of the task (same screen as that of the sequence)
![]() : Automatic assignment in order of display in ascending order
: Automatic assignment in order of display in ascending order
![]() : Sorting of areas by automatic assignment in descending order
: Sorting of areas by automatic assignment in descending order
![]() : Manual numbering or modification of the order of one or more areas (modification is possible when the boxes are white)
: Manual numbering or modification of the order of one or more areas (modification is possible when the boxes are white)
- You can filter by zone and zone type for each zoning level using the funnel:
 .
. - To reset the changes made on each column, simply click on the eraser at the top of each column.
4.9.9. Microtask material
- This tab allows to refine the materials to the micro-task. However, there must be at least one subject filled in in the Materialtab.
- You can change the values for each material at the micro-task. You can use the black square at the bottom right of the cells to pull the values down.

4.9.10. Notes
- As with sequences, you have the option to add notes on a task from the Notestab and then click on the button at the bottom right of the page:

- At each click, a yellow it post will appear. Just click on it to write in it.
- To delete a note, just put your mouse over it, a trash can will be visible at the top right of the post it:
 .
.
4.10. “Design” task
- The “design” task is a task defined by a time associated with a trade.
- From the Edit Tasksscreen obtained by clicking on
 , then select the Design task button:
- This type of task is useful for the development of the decision planning, where no workforce or takt time must be added:
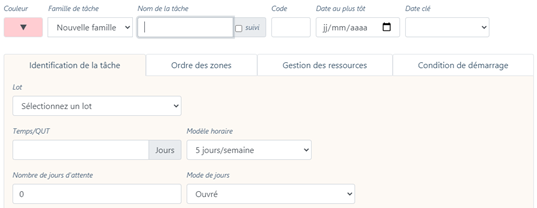
- This type of task can be update by the scheduling, workflow or mobile version.
- A design task, such as a “work” task, must be linked to a predecessor and/or successor
- It is represented in the planning and edit tasks as follow:

4.11. “Milestone” task
- The “milestone” task is a point of passage in the project, characterizes key moments in the sequence, has no notion of duration or workforce. For example, the end of the tests. You can also associate this task to a key date.
- From the Edit tasks screen, obtained by clicking on
 , then select themilestone task button
- As for a work task, you must give it a color, a name, and a code. You cannot assign it a rhythm and a trade, only a work level and an hourly model, like below:
- It is possible to mark the progress for a milestone, from the schedule or from the mobile application by checking the box:
 when editing.
 - If you want to force a specific milestone date by level, for example for an Out of Air per floor, go to the Microtask tab, and in the Datecolumn you can add a date as soon as possible:
-

- From this tab, you can deactivate the milestone on one or more zones, by putting 0 in the Showcolumn on the right.
- The milestone name can be changed for each micro-task using the Labelcolumn.
- A “milestone” task, like a classic task, must be linked to a predecessor and / or a successor.
- It is represented in the planning and edit tasks as follow:

4.12. “Waiting” task
- The advantage of creating a waiting task is to avoid seeing a gap on the schedule. But you can very well enter this wait in a task in the number of days waiting field or in a linkbetween two tasks
- From the Edit task screen, obtained by clicking on
 , then select the Waiting task button
  , then complete at least the name, code, and time of the task:
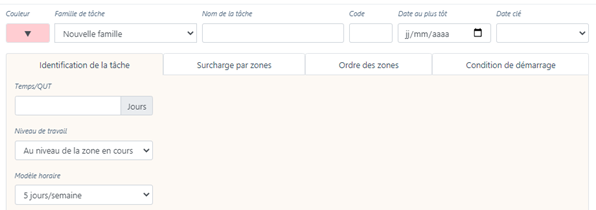
- The waiting task only has a duration that can be changed depending on the area and is not staffed so as not to disrupt the reports.
- A 7-day/week waiting task will not affect the entire schedule.
- It is represented in the planning and edit tasks as follow:

- This type of task can be update by the scheduling, workflow or mobile version.
4.13. “Delivery” task
- A delivery task anticipates the execution of work tasks.
- From the Edit taskscreen, obtained by clicking on
 , then select the delivery task button
- This task has no associated quantity or time and is associated with a trade.
- This delivery task can be associated with a work task, by going to the Materialtab of the work task:

- From the micro-task tab, you can deactivate the delivery on one or more areas, by putting 0 in the Showcolumn on the right.
- This type of task can be progressed (validated or not validated) via the schedule, the workflow or the mobile version
- It is represented in the schedule and edit tasks as follow:

4.14. “Technical” task
- This type of task adds tasks to the schedule that will not be associated with a trade and several teams. This task is only determined by a quantity of work and time.
- From the Edit task screen, obtained by clicking on
 , then select the technicaltask button
- By default, this task is not displayed on the general schedule but only on the sequence schedule.
- • It is represented in the planning and edit tasks as follow:
 .
.
4.15. Tasks Tab
- You also have the possibility to see all the tasks of the project, you can go to the Taskstab.
- This visualization of tasks is rarely used during scheduling, this makes it easier to have the list of tasks in a sequence for example.
- You can use different filters by trade, company, sequence, to generate the list of desired tasks:
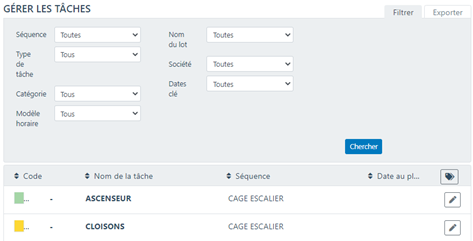
- Tasks are sorted by sequence family and then by sequence. You can click on them to show or hide items.
- If you have added one or more notes to a task, you will see a yellow it post to the right of the name, like this: :
 .
. - You can then export these lists in the Exporttab, then click on
 which will automatically generate an Excel file.
4.16. Creating Gantt Tasks
The creation of a schedule in Gantt format is done directly via the Schedulingtab. First create the “Gantt” areas and then assign tasks.
1. At the bottom of the page of the Schedulingtab, you will find a button “create a Gantt area” via the “+” :![]()
2. Here a window will open to edit the area with a color, name, code, date and the position of the area:

3. Then select the “next” button:
4. You can now create your tasks. It is possible to create 4 types of tasks: Work, Milestone, Study, Delivery.
In addition to the fields of a typical task, you must define the WBS field.
![]() The notion of WBS allows to break down the structure and the order of the tasks. For example WBS = 1.1 and 1.2 will be contained in the task having a WBS = 1.
The notion of WBS allows to break down the structure and the order of the tasks. For example WBS = 1.1 and 1.2 will be contained in the task having a WBS = 1.

When a Gantt area is created with a task, the corresponding sequence is automatically created in the Sequencestab: 
You can then change the information: ![]()
![]() Remember to restart a schedule calculation if your Gantt area is not displayed with this button:
Remember to restart a schedule calculation if your Gantt area is not displayed with this button: ![]()
You can add new Gantt tasks from the schedule in this area by clicking on the “+”:

You can also move tasks at your convenience, by moving to the right of the y-axis.
Then move the task to the desired position, the WBS will be modified: image :  .
.
You can also work on your Gantt tasks directly in the area sequence:
- Editing tasks

- Linking Tasks
- Creation a new task
- Modifying the characteristics of an existing task
- Sequence Task Settings:

- A Task Order (WBS) column allows you to quickly restructure the area
- Good to know
- A Gantt task can be selected either via the buttons:

- The options of a Gantt task are the same as the classic tasks in Teamoty except for the notion of WBS
- A Gantt task can be selected either via the buttons:
![]() Use microtask links to link your Gantt to your traditional geo-temporal planning:
Use microtask links to link your Gantt to your traditional geo-temporal planning: ![]()
4.17. Creating Summary Tasks
Starting from a schedule, you now have the possibility to create summary tasks, allowing to have a global view of the tasks composing these summary tasks. You will see the start date as well as the end date.
To add a recap task, you must click this button:: ![]()
A window will open to edit the summary task or you must choose:
1.The name/code/color of the summary task,
2. On which destination area will this task be created
3. The task to start the task and on which associated areas
4. The end task of the task and on which associated areas
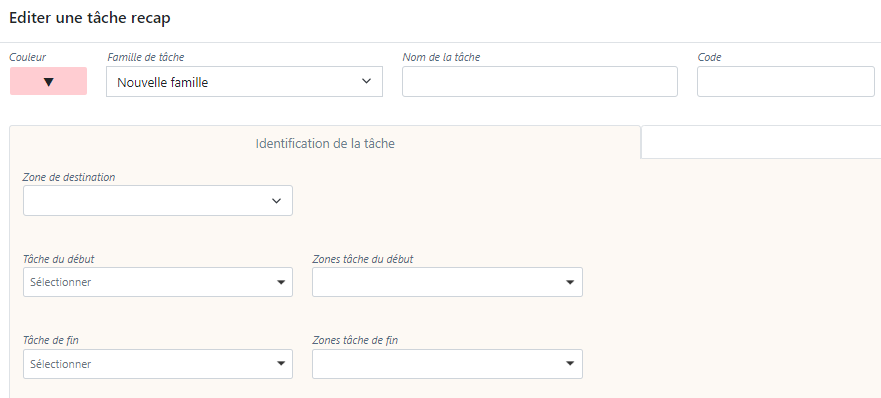
Once created, it will appear as follows at the selected destination area:

You can edit it at any time or delete it in use “Edit Tasks“: ![]()
On the Planning tab (see Scheduling), these tasks will only be visible in Time location format. From the Tasksfilter, you can choose to show or hide them, and even edit them:
